manifest-localhost.xml file should appear as follows in File Explorer in the shared C:\P1Software\OfficeAppManifests folder.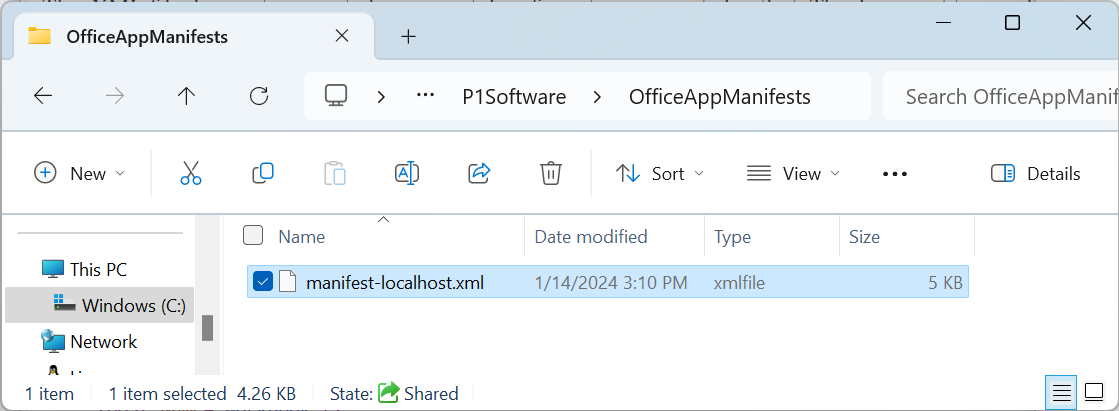
Version 0.0.5
Engineering Beta, January 7, 2025
taskpane-guide.html
This is an Engineering Beta used for soliciting usability feedback from engineers. Although we've run it through several 24 hour stress tests, we highly recommend you experiment with it in non-mission critical conditions.
P1TS Data is an Excel add-in that live fetches data from a P1TS server and directly writes data into into your Excel spreadsheets for easy access.
For Excel users, it can replace p1ts-csv eliminating the dependency on additional program (p1ts-csv.exe) and its artifacts (CSV files). Its column names are compatible with those of p1ts-csv.
General-use Office Add-ins are usually obtained from the Microsoft Office Store. While we may publish P1TS Data to the Store in the future, for now we must perform these setup steps:
Excel reads our manifest-localhost.xml manifest file to find where to get the P1TS Data add-in (it is on your PC that is running both Excel an your P1TS server). Excel requires that the manifest's folder be a shared folder that we have been explicitly given access.
OfficeAppManifests under C:\P1Software, where you installed P1TS. Use File Explorer to create the new folder.OfficeAppManifests a shared folder. Using File Explorer:C:\P1Software\OfficeAppManifests folder\\P1SOFTWARE-PC1\OfficeAppManifestsmanifest-localhost.xml into the shared folder.http://localhost/p1imsa/p1ts-excel-addin/OfficeAppManifests/manifest-localhost.xmlmanifest-localhost.xml page to the C:\P1Software\OfficeAppManifests shared folder that you created above.Your manifest-localhost.xml file should appear as follows in File Explorer in the shared C:\P1Software\OfficeAppManifests folder.
While there will be future updates to the P1TS Data add-in (delivered via your P1TS server), we generally do not anticipate that you will need to repeat these P1TS Data Add-In Setup steps in the future.
localhost - In computer networking, localhost is a hostname that refers to the current computer used to access it (i.e., your PC).
If you are running both your P1TS server and webapp (e.g., Strat 1) on the same computer, you can type localhost in your browser's address bar instead of its numeric IP address.
Our manifest explicitly labels our add-in P1TS Data (localhost) to emphasize the add-in is obtained from the P1TS server on our localhost PC. In the future if the add-in is published in the Microsoft Store it would need a different manifest - we would then not include (localhost) in its label.
Perform these steps to install the P1TS Data add-in into Excel
\\P1SOFTWARE-PC1\OfficeAppManifestsYou will be notified, usually via email, when the P1TS Data add-in has received new software updates (reflected in its version number). To load any new software updates follow these steps, which can be executed at any time.
If for some reason you want to remove the P1TS Data add-in from Excel, clear the Office cache on Windows:
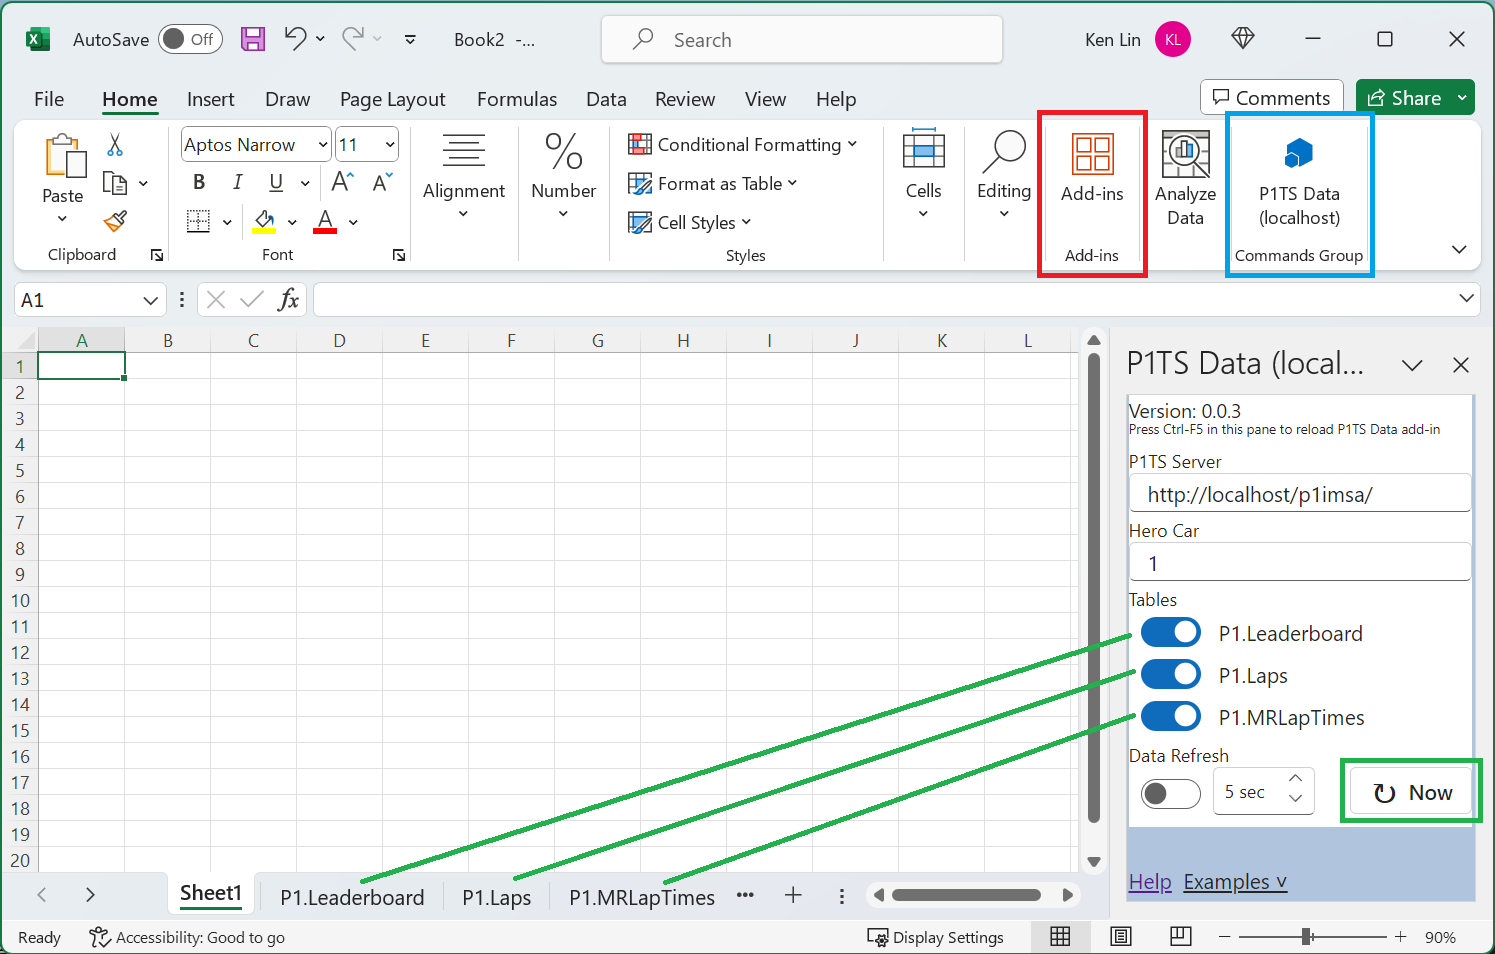
In your workbook's Home ribbon you should now see P1TS Data (localhost) (blue). When clicked, the task pane on the right will appear.
When data is refreshed, only the tables that are enabled will be refreshed (green). The tables reside in worksheets that are automatically created with the same name.
P1TS data is written to Excel tables instead of simple cell ranges. This allows you to use structured references instead of cell addresses. We'll see in Examples how they might be used. Here are some notes about the data and cell values.
`1 and '01 to both be represented.m:ss.000.#N/A appears in cells with no value.The P1.Leaderboard table's rows contain the current information about each car, commonly displayed in leaderboards. The rows are ordered by overall position.
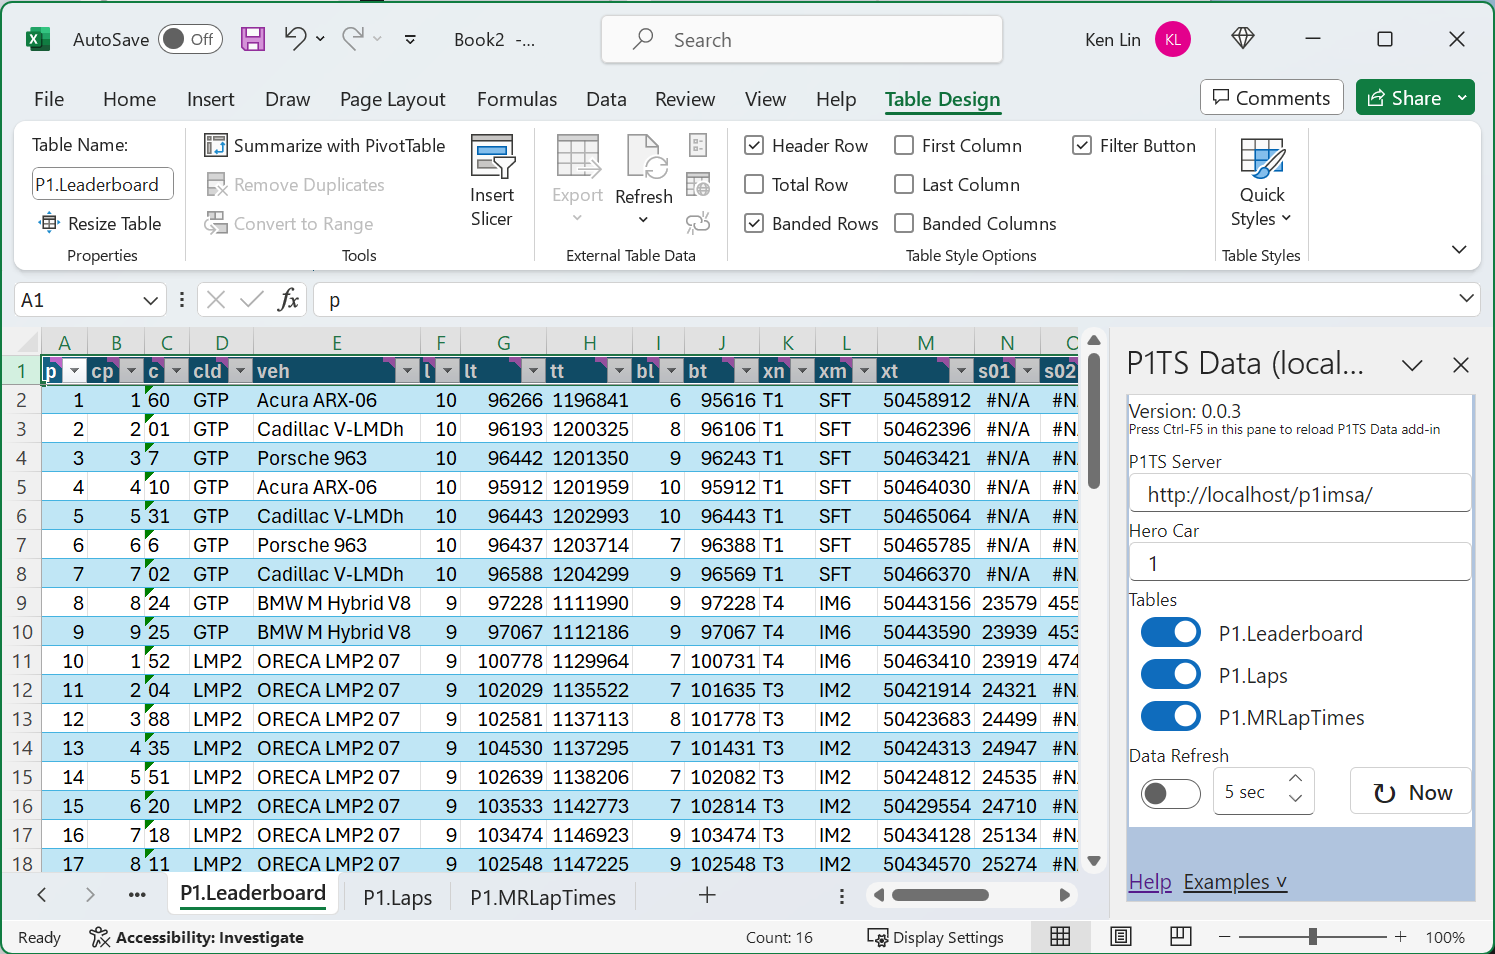
The following describes each of the columns in the P1.Leaderboard table. The column names are all short, lower-cased identifiers.
| Col | Type | Definition |
|---|---|---|
p | Number | Overall position at lap completion |
cp | Number | Class position at lap completion |
c | Text | Car number (this is Text so 1 and 01 can be handled) |
cld | Text | Car class description (e.g., GTD) |
veh | Text | Vehicle description |
fn | Text | Driver first name |
ln | Text | Driver last name |
l | Number | Completed lap number |
lt | Number | Lap time in milliseconds |
tt | Number | Session time in millseconds at lap completion |
bl | Number | Best Lap Number |
bt | Number | Best Lap Time (ms) |
xn | Text | Last crossing number (per IMSA) |
xm | Text | Last crossing name (per IMSA) |
cst | Text | Car Status: T(rack), P(it lane) |
pl | Number | Last Pit lap number |
s01 | Number | Sector 1 time in milliseconds |
s02 | Number | Sector 2 time in milliseconds |
s03 | Number | Sector 3 time in milliseconds |
The P1.Laps table contains detailed lap information about the Hero Car, one row per lap. This table may be expanded in the future to include sister cars and follow cars, but for now it is limited to only Hero Car data.
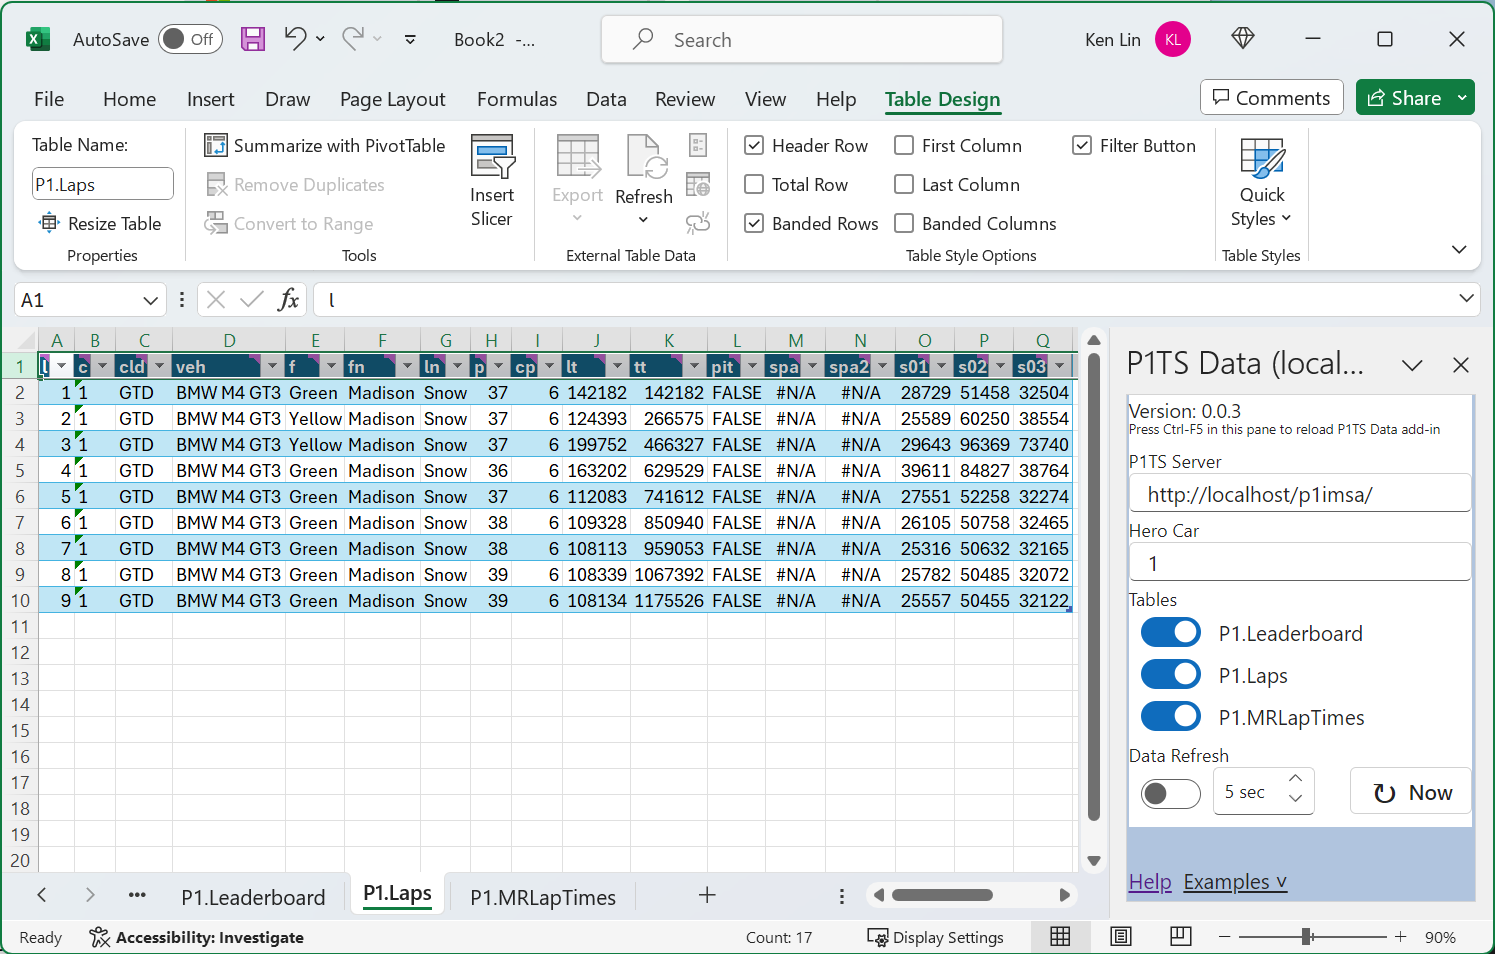
The following describes each of the columns in the P1.Laps table. The column names are all short, lower-cased identifiers.
| Col | Type | Definition |
|---|---|---|
l | Number | Completed lap number. Guaranteed to be the first column, to facilitate Excel VLOOKUP by lap number. |
c | Text | Car number (this is Text so 1 and 01 can be handled) |
cld | Text | Car class description (e.g., GTD) |
veh | Text | Vehicle description |
f | Flag at lap completion |
|
fn | Text | Driver first name |
ln | Text | Driver last name |
p | Number | Overall position at lap completion |
cp | Number | Class position at lap completion |
lt | Number | Lap time in milliseconds |
tt | Number | Session time in millseconds at lap completion |
pit | Boolean | TRUE if car was in pit lane on this lap, FALSE otherwise |
spa | Number | Speed trap A's MPH x 1000 (176713 = 176.713 mph) or #N/A |
spb | Number | Speed trap B's MPH x 1000 or #N/A |
s01 | Number | Sector 1 time in milliseconds |
s02 | Number | Sector 2 time in milliseconds |
s03 | Number | Sector 3 time in milliseconds |
The P1.MRLapTimes table contains each car's most recent 50 lap times arranged in a column making it easy to insert into an Excel multi line chart for study.
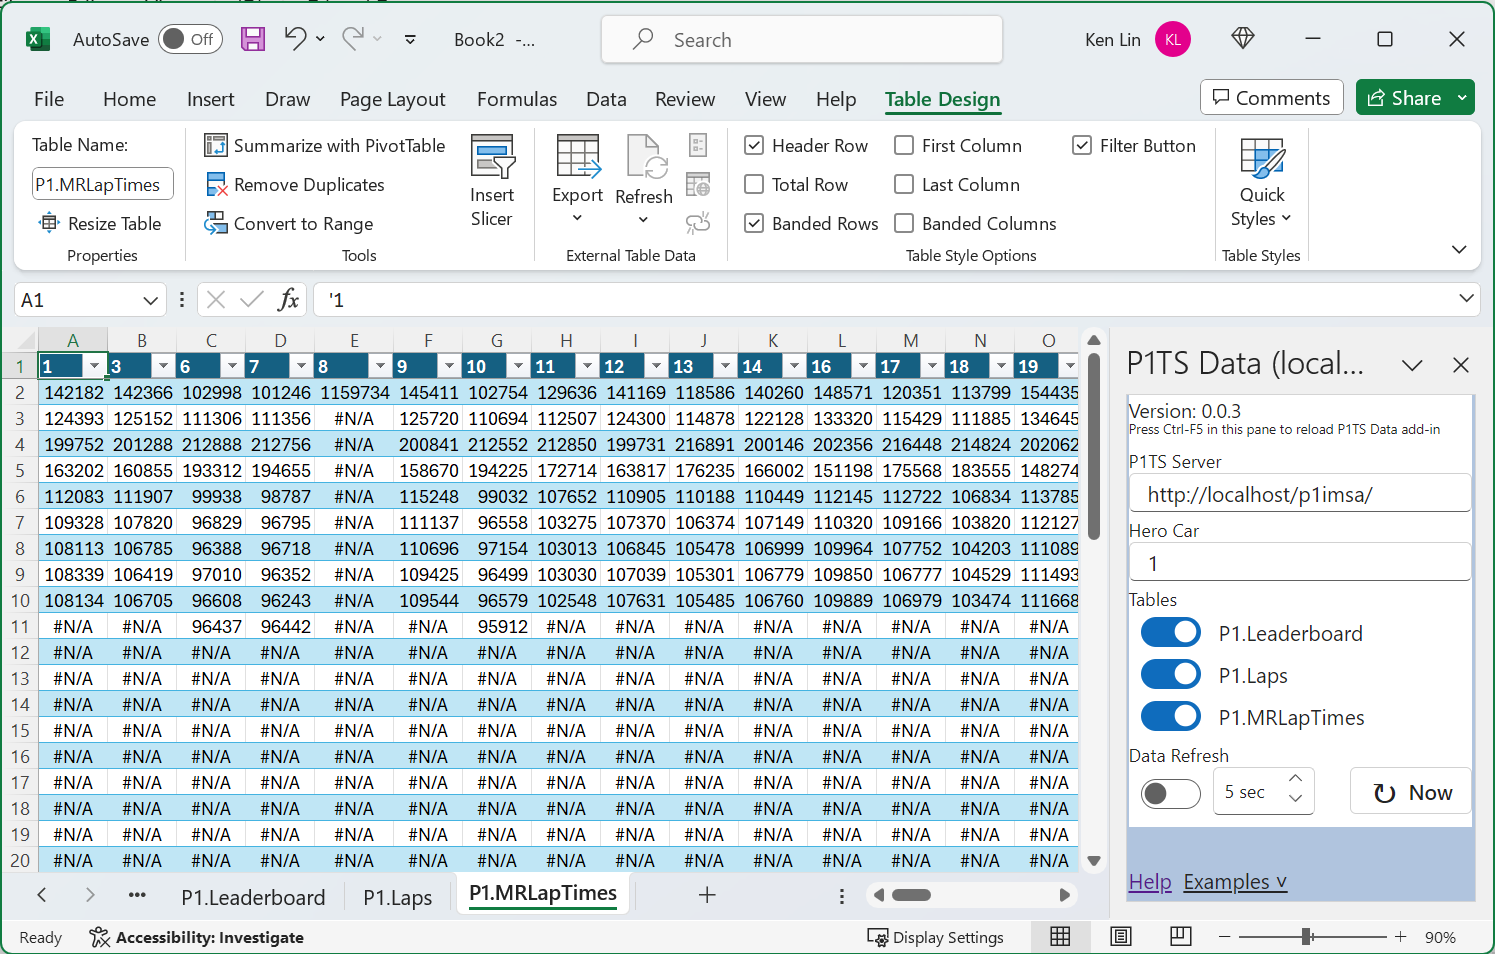
The lap times are the same as the most recent 50 values for every car appearing in P1.Laps[lt].
These examples are provided to illustrate how you might possibly use the tables in your proprietary strategy calculations.
WARNING: Since your personal sheet contains references to the P1TS Data tables, we remind you that Excel will obliterate your formulas with #REF! errors should the structured references become invalid.
The My.Leaderboard worksheet is generated by clicking on Examples ˅ (green box) in the lower right. It is pictured below with Ctrl+G pressed, showing the maintained tables in the Go To dialog.

This worksheet shows some possible ways of using the P1.Leaderboard table. Since P1.Leaderboard is an Excel table, rather than a simple range, one can use structured references (e.g., P1.Leaderboard[p] for the overall position column) to more easily refer to P1.Leaderboard table's columns.
| Label | Cell | Content | Col Format |
|---|---|---|---|
| P | A5 | =P1.Leaderboard[p] | General |
| CP | B5 | =P1.Leaderboard[cp] | General |
| C | C5 | =P1.Leaderboard[c] | General |
| Cls | D5 | =P1.Leaderboard[cld] | General |
| Lap | E5 | =P1.Leaderboard[l] | General |
| Name | F5 | =BYROW(P1.Leaderboard[fn]:P1.Leaderboard[ln], LAMBDA(a, TEXTJOIN(" ", TRUE, a))) | General |
| Lap Tm | G5 | =P1.Leaderboard[lt]/86400000 | Custom m:ss.000 |
| S01 | H5 | =P1.Leaderboard[s01]/86400000 | Custom m:ss.000 |
| S02 | I5 | =P1.Leaderboard[s02]/86400000 | Custom m:ss.000 |
| S03 | J5 | =P1.Leaderboard[s03]/86400000 | Custom m:ss.000 |
| Total Tm | K5 | =P1.Leaderboard[tt]/86400000 | Custom h:mm:ss.000 |
| L Stnt | L5 | =IF(P1.Leaderboard[l]>=P1.Leaderboard[pl], P1.Leaderboard[l]-P1.Leaderboard[pl], 0) | General |
P1.Laps table's fn and ln columns to TEXTJOIN to create a full name.The My.RunSheet worksheet is generated by clicking on Examples ˅ in the lower right.

This worksheet shows some possible ways of using the P1.Laps table. Since P1.Laps is an Excel table, rather than a simple range, one can use structured references (e.g., P1.Laps[l] for the completed laps column) to more easily refer to P1.Laps table's columns.
| Label | Cell | Content | Col Format |
|---|---|---|---|
| Laps | A5 | =P1.Laps[l] | General |
| P | B5 | =P1.Laps[p] | General |
| CP | C5 | =P1.Laps[cp] | General |
| Flag | D5 | =P1.Laps[f] | General |
| Name | E5 | =BYROW(P1.Laps[fn]:P1.Laps[ln], LAMBDA(a, TEXTJOIN(" ", TRUE, a))) | General |
| Lap Tm | F5 | =P1.Laps[lt]/86400000 | Custom m:ss.000 |
| Pit | G5 | =P1.Laps[pit] | Custom m:ss.000 |
| S01 | H5 | =P1.Laps[s01]/86400000 | Custom m:ss.000 |
| S02 | I5 | =P1.Laps[s02]/86400000 | Custom m:ss.000 |
| S03 | J5 | =P1.Laps[s03]/86400000 | Custom m:ss.000 |
| Total Tm | K5 | =P1.Laps[tt]/86400000 | Custom h:mm:ss.000 |
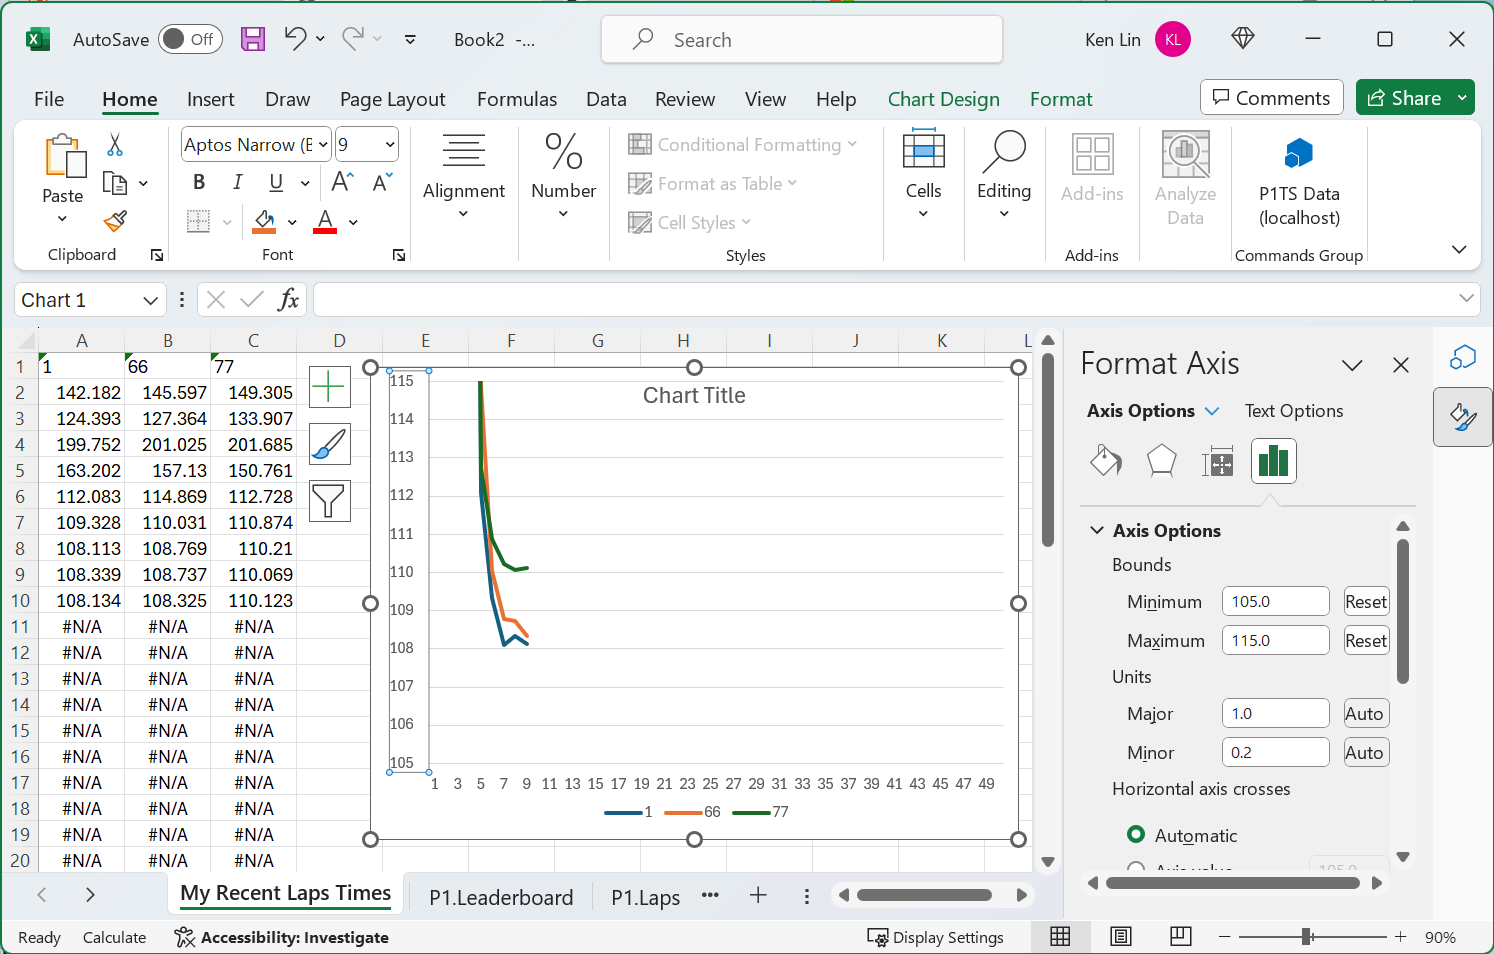
P1.Laps table's fn and ln columns to TEXTJOIN to create a full name.The My Recent Lap Times worksheet shows how one might study the 50 most recent lap times of hero car 1 and follow cars 66, 75, and 78 to possibly study degradation. It references the P1.MRLapTimes table.
This sheet was manually created by using these steps:
| Cell | Content |
|---|---|
| A1 | '1 |
| A2 | =P1.MRLapTimes['1]/1000 |
| B1 | '66 |
| B2 | =P1.MRLapTimes['66]/1000 |
| C1 | '75 |
| C2 | =P1.MRLapTimes['75]/1000 |
| D1 | '78 |
| D2 | =P1.MRLapTimes['78]/1000 |
fn (first name), ln (last name), cst (car status), and pl (last pit lap number) columns.